Make Your Own Bead Clasps
I am enjoying playing with glass and seed beads. When I made my first seed bead bracelet I wasn’t too excited about tossing in a sterling toggle clasp. I think that the clasp cost me more than the bracelet did. I also really don’t like using the inexpensive clasps from the craft store. I don’t care for how they look. I’ve really enjoyed using the buttons. I think they look a little more like they belong when it comes to seed beads but good quality buttons can run as much if not more than a simple sterling toggle. The biggest advantage to using seed beads is that they are less spendy so it doesn’t really make sense to toss on an expensive clasp. What’s a girl supposed to do?
I’ve been busy last few days playing with my Japanese Bead Books. I’ve hit a few stumbling blocks, but I’ve also found a few gems. They are pretty basic so I am just going to share them with you. I am going to show you how to make two similar clasps using seed beads and 4mm fire polish beads. This might be a bit picture heavy.
This Clasp is made using 4mm fire polish beads and size 15/0 seed beads. I used fishing line. To start you want to string on 1 seed bead, 1 4mm,1 seed bead,1 4mm and then 1 more seed bead. The three center beads will be the first *rung* on our ladder. Center the beads on your thread. If you are using fishing line, you won’t need a needle. If you are using thread, you will want to put a needle on both ends. I tried both and I thought that this half of the clasp had a much better feel to it when it was made with the stiffer fishing line.
Step A: Take one end of the thread and string on 1 4mm, 1seed bead and then 1 more 4mm. Take the other thread and cross it through the beads going through the opposite direction

Step B: Then add 1 seed bead to each of your thread. We are making a ladder. Each rung on the ladder will consist of 2 4mm beads with 1 seed bead between them. The remaining seed beads (from step B) will form the sides of the ladder.
Repeat Step A and Step B until your ladder has 6 rungs. Make sure you end with Step B, you really need those two little seed beads on the end.
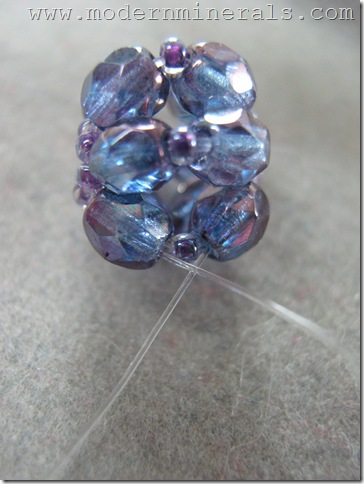
This was a surprisingly difficult photo to take. :p When you finished your ladder you had two thread coming out of the bottom rung. One going out to the left, and one going out to the right. You are going to take those two threads and cross them back through the first rung in your ladder. You want to cross the threads THROUGH the first rung, not before you get them in to the beads. So take the thread that exits to the right and thread it through the top right side of the first rung so that it exits on the left side. Take the bottom thread that exits on the left side, and thread it through the top left side of the first rung so that it exits on the right hand side.
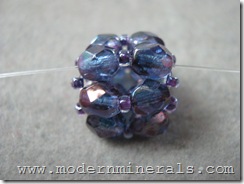
Pull your threads to snug them up. This will give you a nice little ball of beads. When I made this ball with the fire line, once I got to this point it didn’t hold its shape very well. It works much better with the fishing line.
If you look at the end of the ball of beads, you will see that you have 6 little seed beads that are just hanging out. These were the sides of your ladder. The seed beads are on both sides of your ball of beads.
You want to run your thread through the 6 seed beads so that you make a circle. I don’t think it matters which direction you go, so do what is comfortable. I worked mine in a counter clockwise direction. Pass the thread through the beads a second time. I did not snug up the thread as I went, I waited until I went around twice. Then give it a good pull and draw those beads into a tight little circle. Do the same to both sides of your ball of beads.
Once you have pulled your circle of beads tight on both ends you need to decide what to do. In this particular pattern, the directions have you move straight in to working the bracelet, so that is what I am going to show you how to do. If you want to work the rest of your bracelet or necklace with another kind of thread, tie it off ( I will cover that in the next one) and then run your thread through a central seed bead when you get started. Either way you need to bring your threads back to the center of one of the rungs. To do that you want to run your thread back through one of the 4mm towards the center of the rung. Make sure you are using the same rung with each thread. In the photo above I have my thread exiting on either side of the seed bead. If you can, you can cross your thread through that central seed bead and skip the next bead.
In the photo on the left, I crossed my beads through a second seed bead. I can’t read the directions and the diagram wasn’t clear on this bit. Unfortunately there wasn’t a close up of this part of the bracelet. Once I crossed through the seed bead, I added 2 seed beads to each thread and then I crossed the threads through 1 more seed bead. At this point I am ready to move on to making the bracelet.
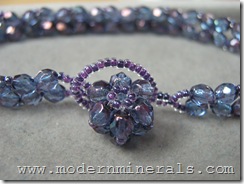
When you get to the other end, you will want to make your loop large enough to slip over the ball of beads. I believe I used 35 size 15/0 Seed beads.
This has been an interesting project. The bracelet is not yet finished. I still have a few kinks I am working out, and then I will do a post about it. I have enjoyed trying to figure out what size seed beads I need. I admit that I have made several trips to the bead shop over the last few days. :p I really like how this clasp looks with the bracelet, it is like adding a little decorative flower. If you want something a bit bigger you can make this with size 11/0 seed beads, but you will need to adjust how many seed beads you use to make the loop on the other end.
This post is a bit longer than I thought it would be, and there are even more photos that go with the next clasp so I think I am going to make that a separate post. I should have it up later this evening. I had hoped to get them both done this morning, but I have to make a trip to the hospital for lab work, Cafe Med is calling my name and I have a Science Fair to attend. 🙂


Lovely, Perfect for people allergic to normal findings like silver plate, and easy for young ones to use.
[…] are. The one made out of size 11 beads is quite a bit thicker.You want to start this bracelet by making the flower clasp. I started with size 11 beads. You’ll want to use a pretty decent length of thread because […]
This is so cool! Thank you for posting the instructions as well as the pics. I am fairly new to beading and your instructions were so clear! I am excited to find a new way to add a closure to the few bracelets I have learned to make and not have to use the same old metal toggle clasps.
Sincerely,
Viki
Birmingham, AL
Thanks so much for this splendid tutorial. A wonderful variation from the more common toggle clasp! Pearl