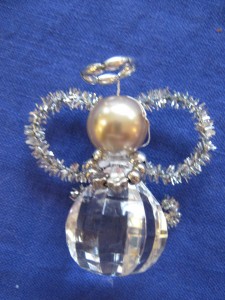
Angel Variation
When I sat down to work on the instructions for the beaded angel ornament I wasn’t sure exactly what I was going to do. So, I got out all of my crafty stuff and played around a bit. The end products weren’t all winners, but just because something isn’t my cup of tea, doesn’t mean it can’t be yours. So… I thought I’d share.
First up, pipe cleaner wings.

step one
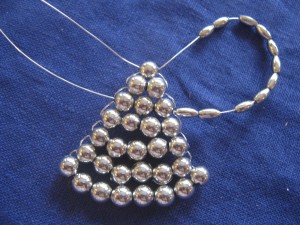
Run the pipe cleaner through your top dress bead. Th next photo will show you what to do with the pipe cleaner, but it isn’t attached in the photo. I did this intentionally, because it’s so much easier to see the bow shape (for construction purposes) when it isn’t attached to the ornament.
Basically, your just going to form a loop on either side and give it a twist or two to keep it in place. You aren’t actually tying a bow. You’ll then trim your pipe cleaner and curl up the ends, giving it a butterfly shape.

Bow
This is the general shape that you’re going for. You’ll want to make it an appropriate size for the ornament that you are attaching it to

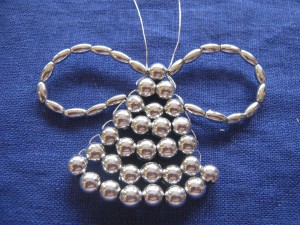
Wings
This is what it is going to look like once you twist the pipe cleaners. in this photo, the bottom half of the wings has yet to be trimmed and coiled up.

Beaded Angel Ornament
Finished Angel Ornament. The other thing that you can do here is bring the ends of the pipe cleaner around to the front so that they serve as arms.
The Halo on this angel was done by the first method. You can find instructions for it in the other Beaded Angel Ornament Post.
Let’s look at another Angel Ornament option

Halo for the angel ornament
This next angel ornament was made from the top down. I started with six of those little oat shaped beads that I got at the craft store, formed a loop and gave it a few good twists. Say hello to the Halo.

Add the head
I added the head a bit differently on this one. I was using fairly fine wire. Crossing the wires through the bead horizontally allowed me to really snug things up, preventing the head bead from moving around. If you want to go straight down through the head, you can first cross them through a smaller anchor bead as I did in the previous post. The link for it is two paragraphs up.

Single bead body
I actually like this style of angel ornament the best. Years ago I bought a bag of drop shaped plastic beads. They’re the sort of beads you’d see hanging from a chain under a lamp. They work well for making the angel’s body and, for an added bonus, take less time as you don’t have to do rows and rows of beads. Also, they g ive the ornament a bit more shape and I really like that.

Arms
This angel got arms, so there is a bit of cross weaving here.
I put on a round silver bead for her shoulder, two much tinier silver beads for her arms and two little flower shaped beads for her hands. I followed those up with two more arm beads and the other shoulder. You bring the beads across the front of the body. You’ll thread the wire from the other side through all of the beads, going in the opposite direction and will cross the beads through the body bead again.

beaded angel ornament
It should then look something like this.
You have options here for wings. You can follow the directions for wings in the other angel ornament post using beads, or you can add pipe cleaner wings. If you decide to go that route you can run the pipe cleaner through the dress bead, just as I did in the above photo. If you don’t have enough space to run a pipe cleaner through, don’t panic. If you make a pipe cleaner bow like the one in the third photo of this post, you can just put one wire on either side of the center of the bow, and then twist the wires to hold it in place

Twist
This isn’t the greatest photo but I hope you can tell what’s going on here. From this point, all you need to do is make a simple wrapped loop so that you can attach a hanger.
Instructions for making a wire wrapped loop can be found here.
It’s not very hard to do, but it may take some practice. You can either attach a simple ornament hook or a ribbon to the loop so that you can hang your ornament on your tree.

angel
Here she is. The picture doesn’t do the ornament justice.
I like this style much more than I do the other kind. They also come together much more quickly. I’m not sure how things are for you, but the closer we get to Christmas, the less time I have to devote to fun projects.
Time is definitely money

angel 2.0
This ornament can also be made from the bottom up. You just center your arms beads on the center of the wire and then cross them through the body bead. Again, you can add which ever wing style you prefer.

Angel ornament
Once you have the wings on, you can just thread both wires wires up through a head bead, and add a halo and hoop via whichever method you prefer.
Instructions for adding a halo can be found in my other beaded angel ornament post.
Ugh. I’m sorry this is so overdue. While I have the best intentions, it seems I sometimes struggle with managing a household, school and maintaining sites. This has been put off, as I wanted to take my time and write a thoughtful post. Time however is a scarce commodity these days. Exams and quizzes seems to follow right on top of one another, and free time has been consumed with errand running and cooking. Hopefully, I’ll get some time over the holidays to get to some of the many projects that I have lined up. Fingers crossed any ways. At any rate, here is a brief overview on how to make a beaded angel ornament.

Cross weave
We’re going to start with the basics here. This particular Angel ornament was made by cross weaving through the beads. This is a technique thing. Not only can you use this technique to make an angel ornament, but you could easily adapt it to make a tree ornament, or even a cross .
Once you get the first two rows of beads, it’s a breeze. This bead represents a row. Thread your bead on and center it on the wire.

adding beads
This is obvious as there are only two beads, but you’ll want to make a note as to how many beads you’re putting in each of the first two rows. I’ve split them up to simplify it, but if you wanted 5 beads in the first row and 4 in the second, you’d simply thread on 9 beads, and then run the wire across through 4 of them. All your doing is crossing the wires through the beads, one row at a time. SO, if you thread your second row of beads on the left side of your first row, pass the wire that is on the right side through the beads you just added, going in the opposite direction.

2nd row complete
Once you snug up (pull tight) your wires you will begin to see the rows form.
That’s really all there is to making the dress for the angel. There’s a lot of freedom in making ornaments this way. I make my ornaments for the site with inexpensive craft beads. It seems like it’s feast or famine here. When I make Christmas ornaments for the site, I usually do several at a time. I have more ornaments than I do space on my tree so I don’t always keep them. However, you can use pearls or even swarovski Crystals if you like. Swarovski does an incredible job of catching the light on the tree. I have some snowflakes that I made with silver and crystal and they are truly something special. If you are looking for something to do as a class project, go with something less expensive.
Let’s make an angel!

Making the Angel's dress
I’m using craft quality beads from my local hobby store to make this angel ornament. Size doesn’t really matter so much. Don’t use beads that are too heavy for the wire. The size and number of beads that you use will determine the size of the finished ornament. With a little creativity you could make a set small enough to wear as earrings.
I have 8 beads in my first row, 6 in my second and 5 in my third. The last one on the first row is a bit wonky, I probably should have gone with 7.

Angel dress and wing
Continue adding rows of beads, decreasing as you go. I used 7 rows
When you get to the top you need to think about how you are going to do your wings. I opted for the inexpensive oat shaped craft beads, but you can use whatever ones you want. You may need to play with them a bit to get wings that are an appropriate size for your angel. I think the wings look best with smaller beads.
Add your wing beads, and then weave the wire through the third row. You have 2 options here. If your wires are fairly evenly spaced, you can weave the wires back up to the top. If one wire is longer, you can use it to make both wings. Once you’ve taken the wire through the third row, you’ll just add the second set of wing beads and cross it though the top bead.

Angel body with wings
Either way, the end result should look something like this.
I’m ok with the rounded angel wings, but the neat thing about working with wire is that bend it to your will. If you do want to shape your wings a bit more, this is a good time to do it. That way, if you decide that you need more, or less beads you can easily modify them. Once you start wrapping the wire changes become much more difficult.

Give her a Head
This is the easiest step. You’ll want to give your Angel a head.
Just take both wires and run them up through an appropriately sized bead.

Halo, way one
There are several ways that you can add a halo to your angel, I’ll show two.
To do it this way, you leave a bit of open wire, add your halo beads, and give them a twist to hold them fast.
Take the other wire and make a loop to hang the ornament from. (not shown) You’ll want to twist the wire around itself at the bottom to hold it fast, and trim off the extra. Then take the other wire (from the halo) and wrap it snugly around all of the wires between the halo and the angels’s head. Clip off any extra wire. I accidentally cut mine too close, severing the wires. So I don’t have a finished angel to show you.

Halo, way two
In the second method, you’ll take those two wires that are exiting your angels head and cross weave them through a small bead. This does two things.
First, it holds everything in place. As you tighten up the wires, it pushes the Angel’s head down snugly against the body. This makes things a bit more manageable while you are assembling the halo.
Second, it gives you a bit of space between the angel’s head and her Halo. I think this looks a bit better. The first time I tried this I just went straight from the head bead to the Halo. It just didn’t look right.

Make the Halo
Add the halo beads to one of the wires and then pass it back through the anchor bead. You’ll have one wire exiting each side of the bead.
Of the two halo methods, this is the one that I prefer.
The only things she needs now is something to hang her by.

Make a Loop to hang her
Twist the wires together.
Once they are twisted nicely together, make a loop to hang her.

Finished Loop
Take the extra wire and wrap it back around the base, then trim. This is a simple wire wrapped loop, you are just making it with two wires that have been twisted together.
Trim you wires.
You can either make or purchase a wire ornament hanger. Just attach it to the loop and she’ll be ready to hang on the tree.
You can also use a pretty piece of ribbon, which is the way I usually go.

Angel Ornament
Admire your handy work.
These angel ornaments are easy to personalize. I like the silver tone beads as they looked nice on the blue and white themed tree that I had a few years back. You can make the angel’s dress out of any color that you like to tie it in to your own holiday decor.
Once you’ve made one of these, they go fairly quickly. That makes these little angel ornaments a good choice if you want to add a little something to a wrapped gift. Just thread your ribbon through the loop before you make the knot for your bow.
Happy Beading!
I just have a moment so I thought I’d say a quick hello, and let you all know that I’ll be posting again soon. I’ve been crazy busy. I spent a lot of my summer bouncing between Dr’s and physical therapists trying to get some joint troubles under control. I was also preoccupied with a child custody and child support issue that was finally settled down at the courthouse yesterday. I love to bead and make jewelry, but nothing in the world means as much to me as my children do. So my health and my children and have been my biggest priority.
I do have some other things that were pushed to the side that also need to be tended to, so it might be a few weeks before I am posting with any regularity. HOWEVER, many of you have emailed me about the beaded angel ornament as the link to the instructions are no longer working. So I will make it a priority to get some sort of instructions up for you over the weekend.
The leaves are starting to here. Autumn and Spring are my favorite times of the year. In the Spring the ground is so full of life. The tender green shoots that appear in the beds fill me with hope as I wait to see which of my plants have made it through the winter. You’d think that Autumn would have the opposite effect, but I love the anticipation that comes with waiting for the leaves to hit their peak. The trees down the street turn the most beautiful shades of red and orange. When they do, the sun hits them just the right way and they light up as if they are on fire. I love the process of the change. This year, it almost feels symbolic.
I closed another chapter in my life yesterday. There will still be visits. Pick ups and drop offs, and notifications of what’s going on, but the need to agree is gone. It’s as if a huge weight has been lifted from my shoulders. There’s not really anything to argue about anymore. I took the summer semester off from school to deal with legal matters and class resumes on Monday. I’m excited. My husband and I are taking a class together so that we can be lab partners. We’ve had such different schedules for so long. It’s going to feel like we’re dating again. Our youngest will be in some form of child care Monday through Friday, and that’s also a big change.
So. Lots going on. Angel ornament coming soon. 🙂


